Squad Management, Missions, Crafting, Trading & UI
Personally, the UI design I prefer in games focus on ease of function and minimal clicks with maximal information and lots of mouse-overs for extra info.
I have carried through with this approach for this game, though it may not be stylish, it is at the least very functional, or at least I hope so.
This blog entry will also cover some aspects of the game’s design and features with some more depth.
Squad Management:
The player will take on the role of the squad’s commander, a behind the scenes role, as there is no player avatar represented. The player makes the decisions but is not the focus of the gameplay.
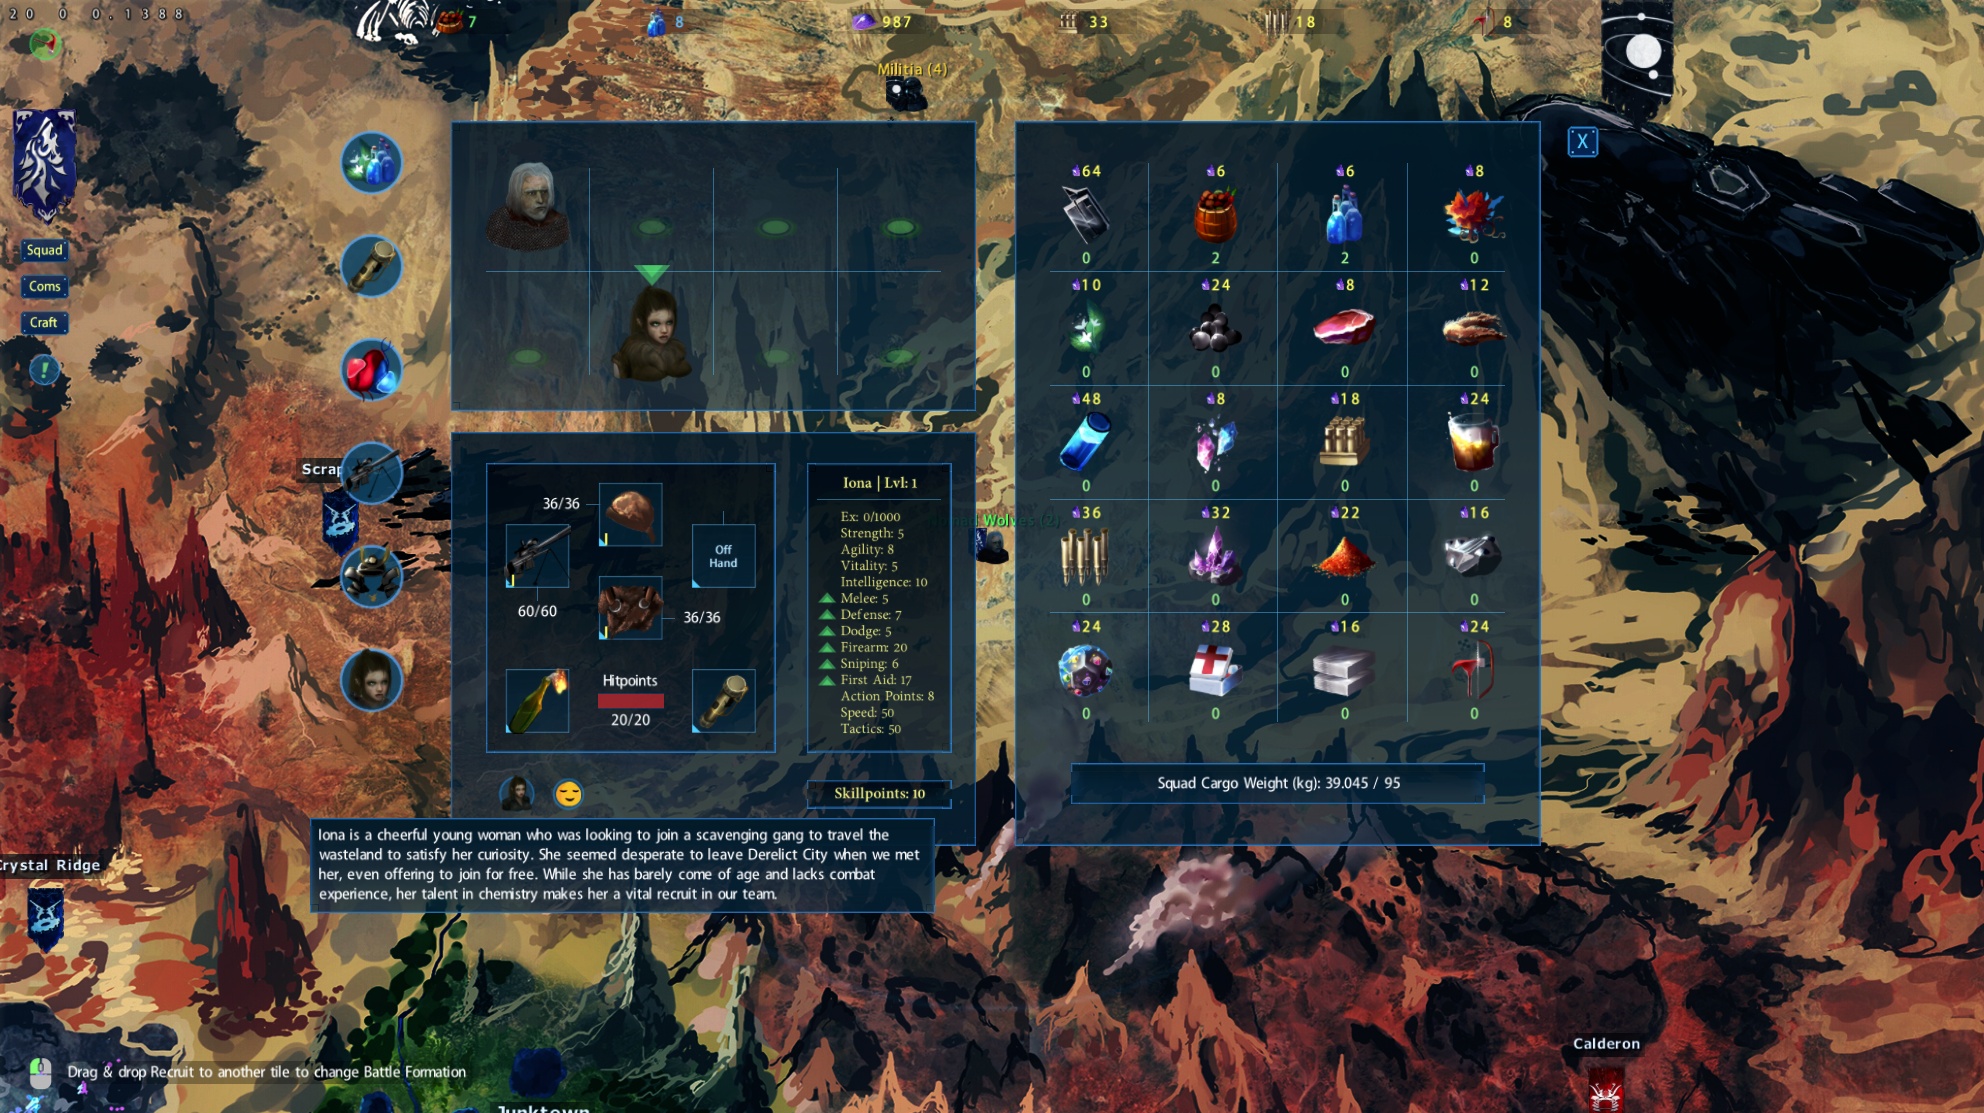
Starting out, the player’s squad has 2 recruits, Varon and Iona. These two are the main characters and the game’s main story will focus around them.
The squad’s main resources are: Purified Water, Rations, Munitions (Small & Large), Tools and Zen tokens (refined Zenium crystals, the currency on this world). Your role as squad commander is to ensure they are sufficiently supplied to survive.

Brief in-game backstory for Varon
Brief in-game backstory for Iona
Through your journey, more recruits become available at various towns and outposts to join the squad once you’ve acquire some experience and reputation.
Each recruit has base stats such as: Strength, Agility, Vitality and Intelligence that affect their combat potential. These stats are fixed and cannot be upgraded, besides using temporary enhancing drugs.
When a recruit levels up, they gain skillpoints which is spent to improve their combat potential in; Melee, Defense, Dodge, Firearm, Sniping and First Aid. The player can decide how to specialize each character in the squad. Note, the skill system is the same for NPCs.
Each character has 4 equipment slots, Body Armor, Head Armor, Main-Hand and Off-Hand. There are many different weapon types to wield, but that will be for the combat blog. Equipment has durability and to repair them over time requires available tools.
Two item slot per character allows you to customize their roles in combat, they could be a medic, a bomber, a debuffer, or enhancer.
As the recruits level up, each 2 levels they can unlock a Perk that grants either squad wide bonuses, or specific character bonuses. Some Perks are active abilities they can use in combat while the rest are passives that gives combat procs or useful bonuses. There are 10 Perk Ranks, at each Rank there are multiple different Perks available, however, you may only select 1 Perk at each Rank. Specialization will be key.
Crafting System:
The crafting system is designed so that it offers more depth to the gameplay experience, particularly fighting the xenobeasts on this world which provide special materials that can be worked into useful items and equipment.
Monster hunting will be more than just about acquiring experience points, as the materials are rarely sold in towns and if available, they are expensive.
Some of the recruits you acquire are skilled in crafting and so they become valuable members of your squad. Iona is a trained chemist, she is capable of making all the consumable items for the team and also Firesand and Munitions.
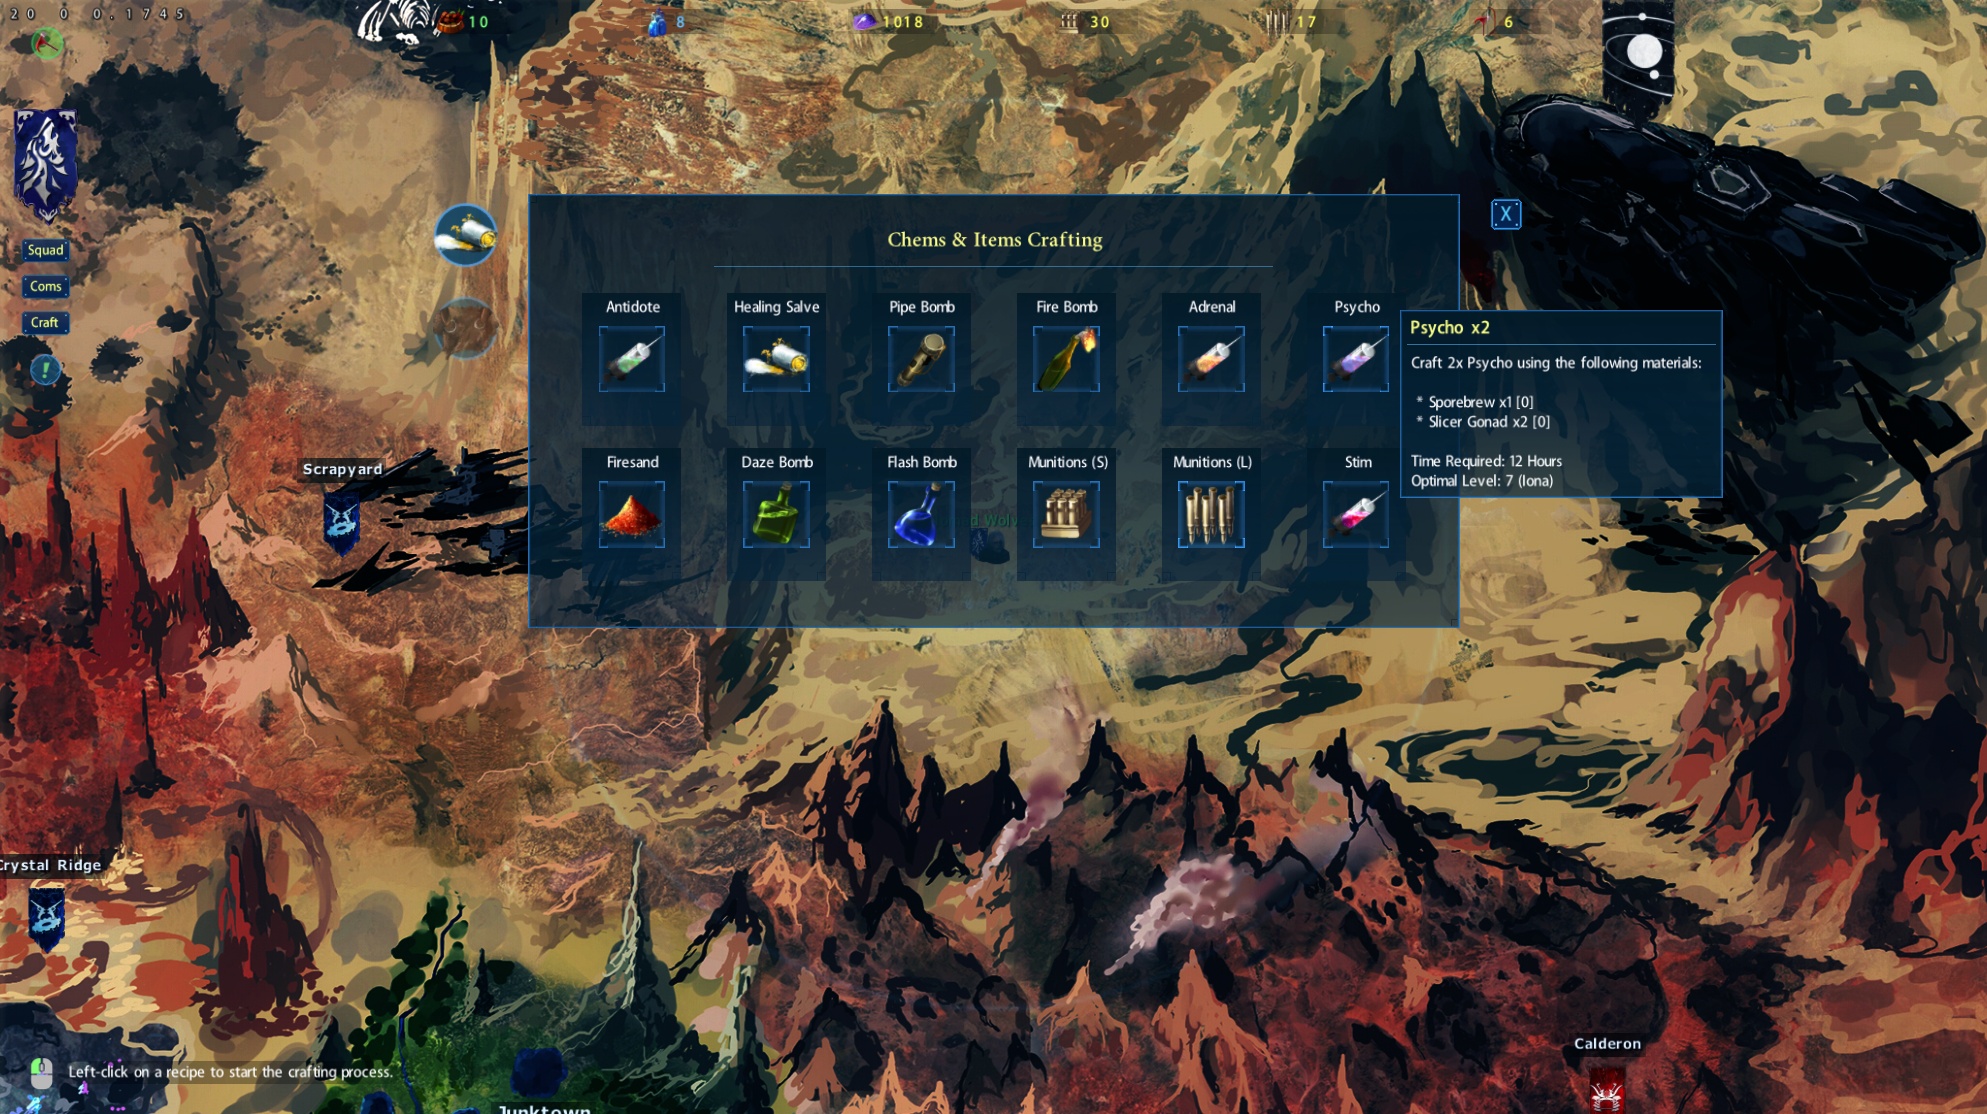
Iona is a capable chemist, proving herself valuable to the team.
Crafting occurs in real-time, progress is made as your squad travel the world map. Each recipe requires a number of hours to complete, along with an optimal level of the character making the item.
You may force the character to try to make a difficult recipe that’s above their level, but there will be a chance of failure and the materials will be lost.
However, if they are higher level and make a lower level recipe, there’s a chance they will create extra bonus items while using the same quantity of materials. It’s design to offer an element of risk vs reward in your decisions.
Once you recruit an Armorsmith, the hides and bones of xenobeasts can be used to create durable armors for the squad.
Trading:
The economy is dynamic and always offers an opportunity for mercantile players to exploit. Trade routes will change based on supply & demand, but a good general principle is that small outposts produce a certain resource that’s near their location, and they always require clean water, food and booze to keep the locals satisfied. Some outpost specialize in production of complex goods, and so they also require resources.
What the town or outpost has on offer to trade will depend precisely on their inventory supply. Each goods are tracked from production to transport, to consumption or use in production of more complex goods.
The Trade UI is designed to be quick and efficient. Perform what you want in as few clicks as possible is my personal mantra. On the left, are icons that represent categories of trade, such as Goods, Items, Materials, Weapons, Armor and Shields. Info is presented on mouse-over for every icon.
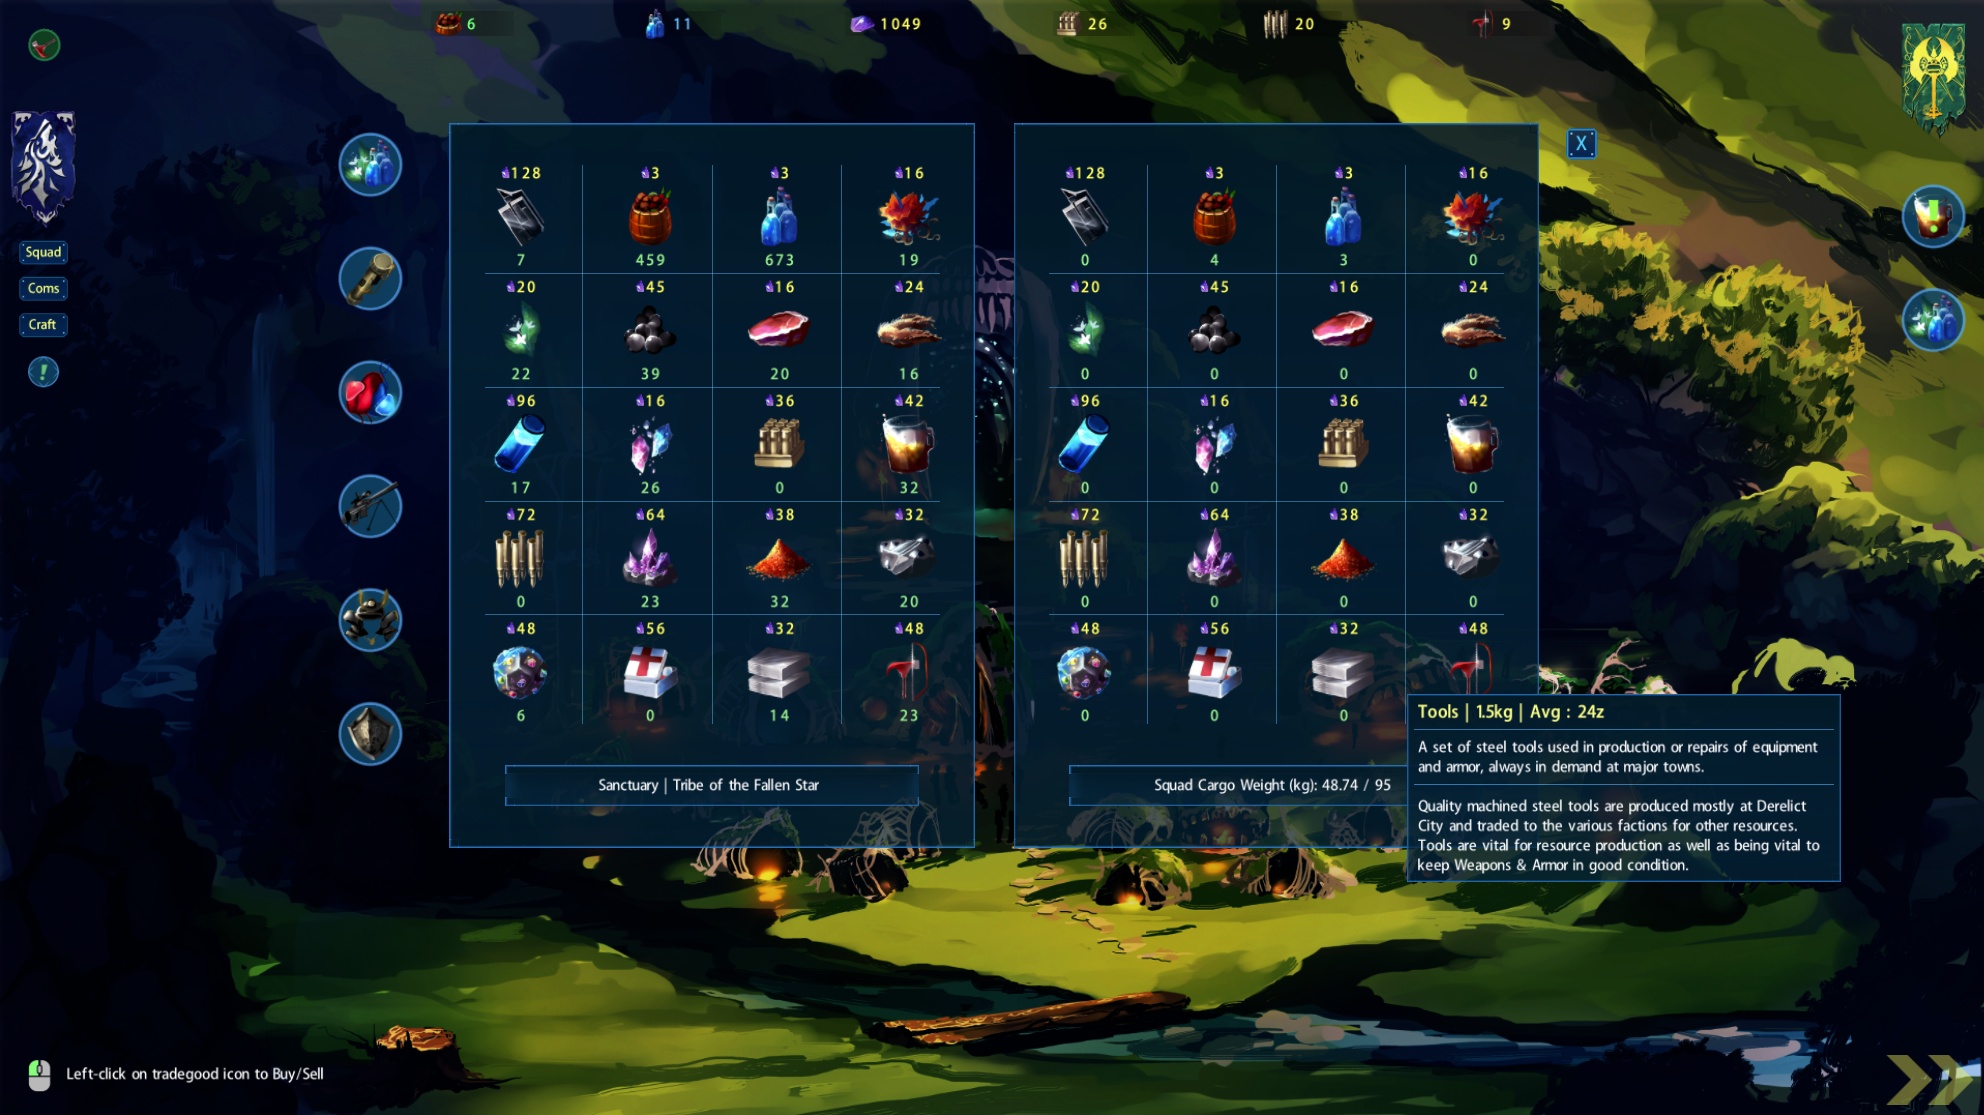
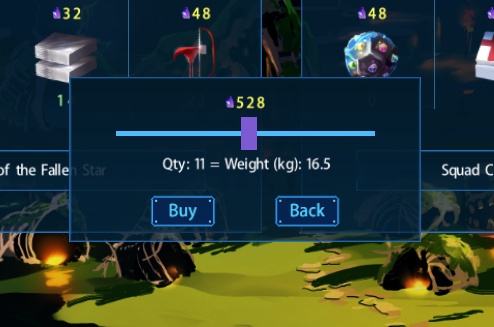
A simple slider and Buy/Sell & Back icon makes it quick and easy to trade in any quantity desired.
For this game, trading is a very rewarding playstyle as it’s the most profitable endeavor. However, regular trading generates no experience points to help the recruits level up. For that, you need to partake in special trade missions.

Resupply (Trade) Mission
Each outpost and town can offer a trade mission which they will broadcast, these missions relate their supply or lack of a certain goods. Similar to the trade crises in Star Nomad 2, they will reward experience and faction standing.
The difference will be this time, progress will be tracked and the quantity they require will be known. When you mouse-over a trade mission icon, it will display the vital info so you can better make decisions. In the above example, Sanctuary needs 30x Salvage (Alloys from space wreckage), the mission will remain active for 4 days.
Through trading, the player can greatly influence the economy of any faction and thus their military units and ability to defend their territory or wage wars on others.
Missions:
Faction towns and outposts are also a source of missions for mercenary groups such as your squad.
The missions available will correspond to the circumstance that the faction faces. If they are at war with an enemy, direct combat missions become available whereby they offer a strong and highly renowned mercenary group the chance to directly help them in conquest.
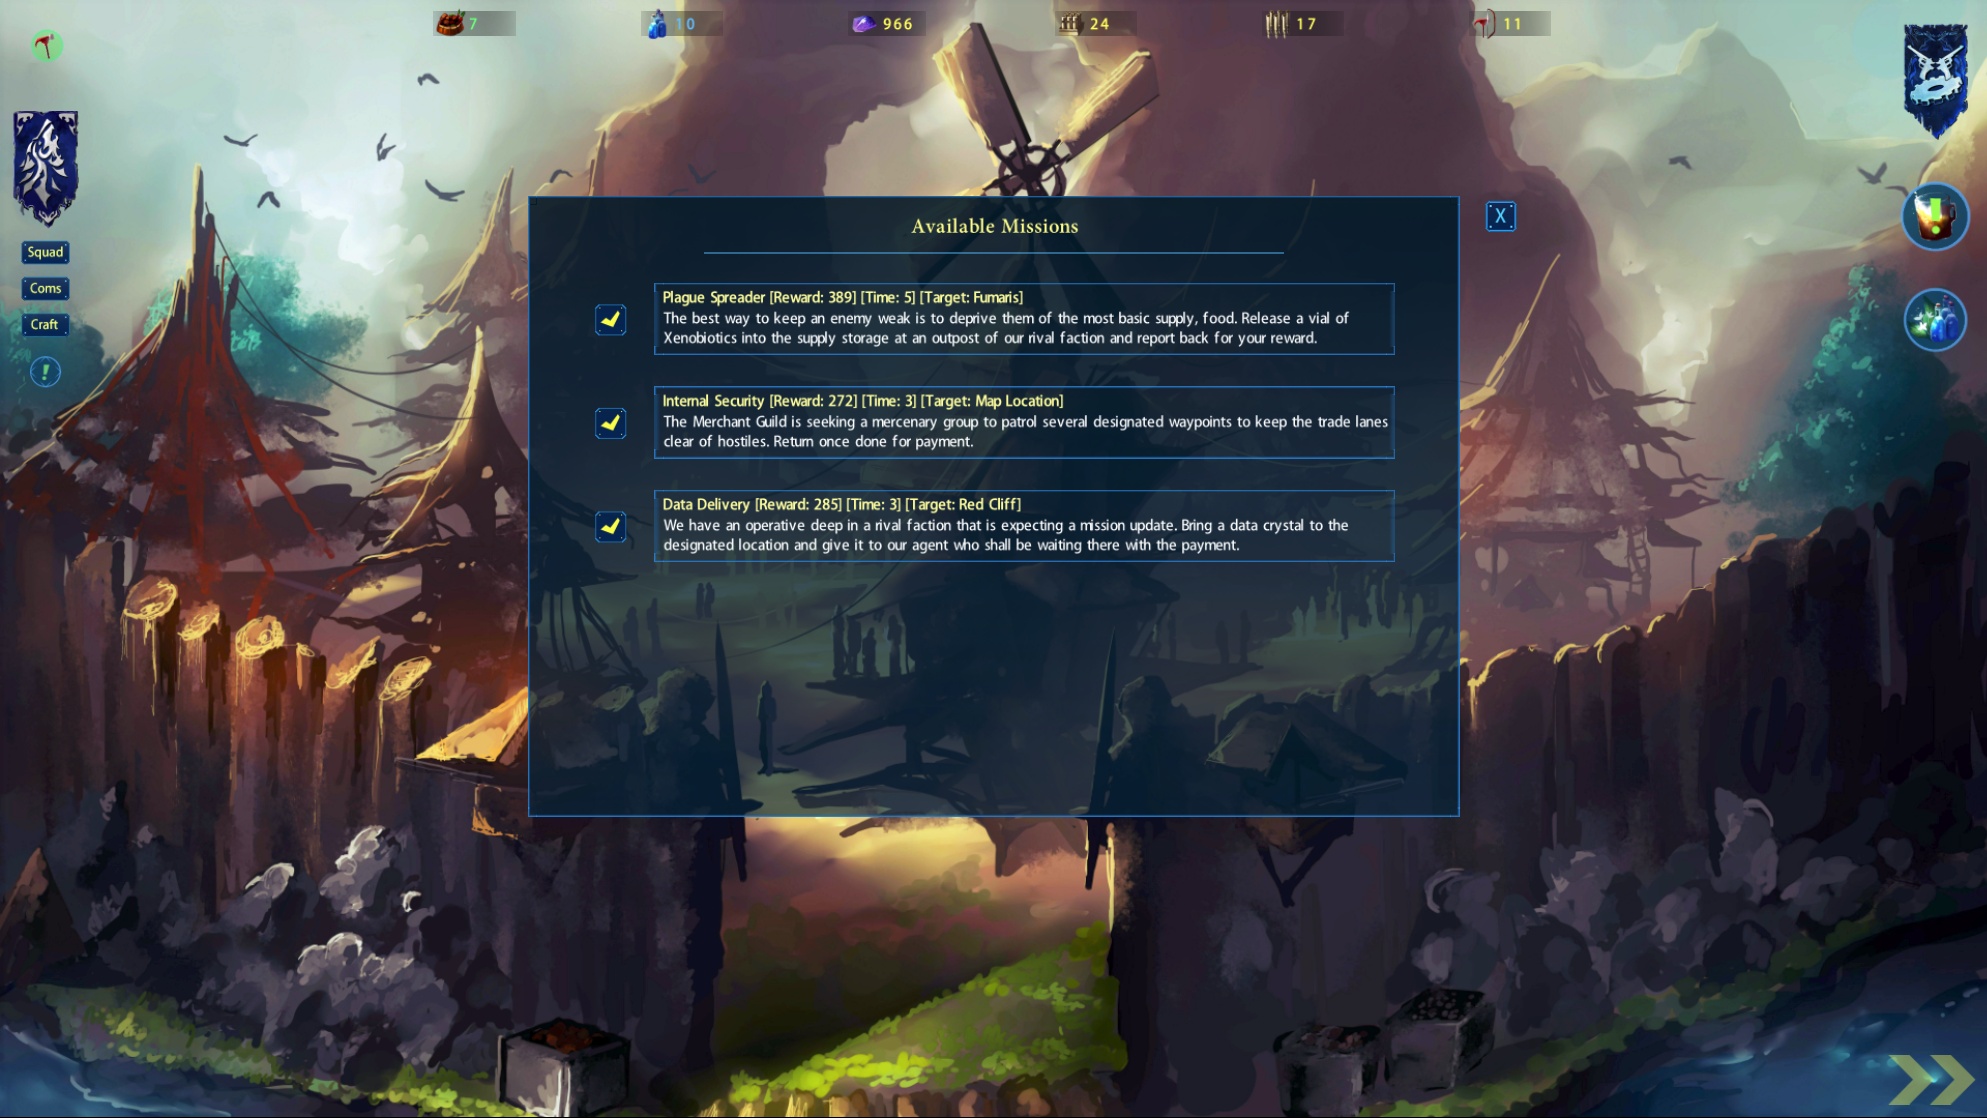
In times of peace, other types of missions become available.
If local raiders or xenobeasts prove annoying enough, the towns and outposts will offer missions for bounty hunting. Note that bounty hunting missions will not remain active for long as there are NPC scavenger groups that can also partake in bounty hunting.
To see available missions, visit the bar at each location.
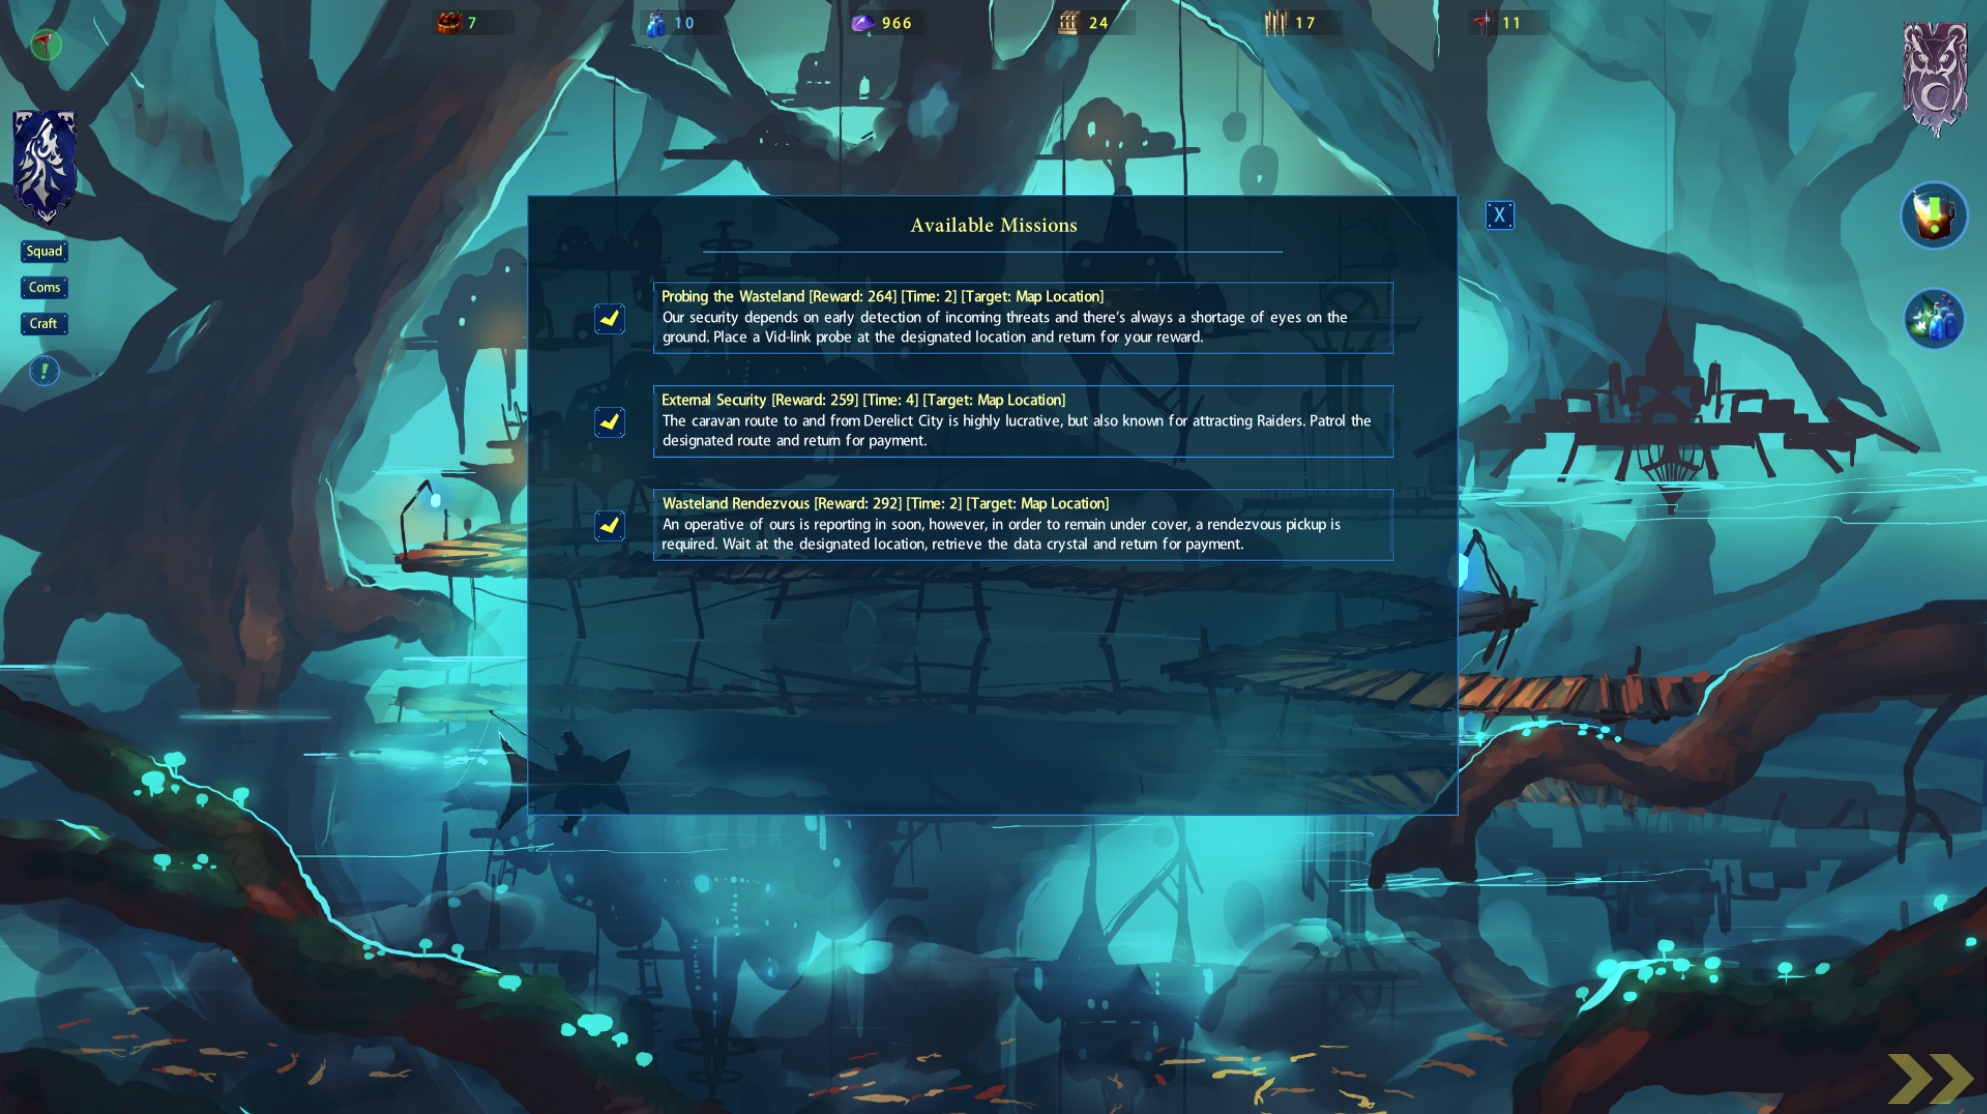
The mission system is designed in a way where player action will have consequences on the game world. There are no simple fetch or kill quests that has no impact. Each mission you partake in is important.
For example, a spy mission on a potential enemy faction gives the faction you help an advantage if they siege that location. Doing patrols increase the happiness of the local outposts, and thereby boost their productivity.
Fighting raider camps or xenobeast infestation makes an area safer for caravans and locals, it also lowers the rate at which those hostiles return to the area.
Other more direct missions, such as sabotaging a production facility or even poisoning the food or water supply of an outpost, has major consequences for the target of your actions.
Importantly, most of the contract missions are designed so that there are potentially several outcomes, this random element adds a layer of risk vs reward that I think is fun and also adds to replay-ability.
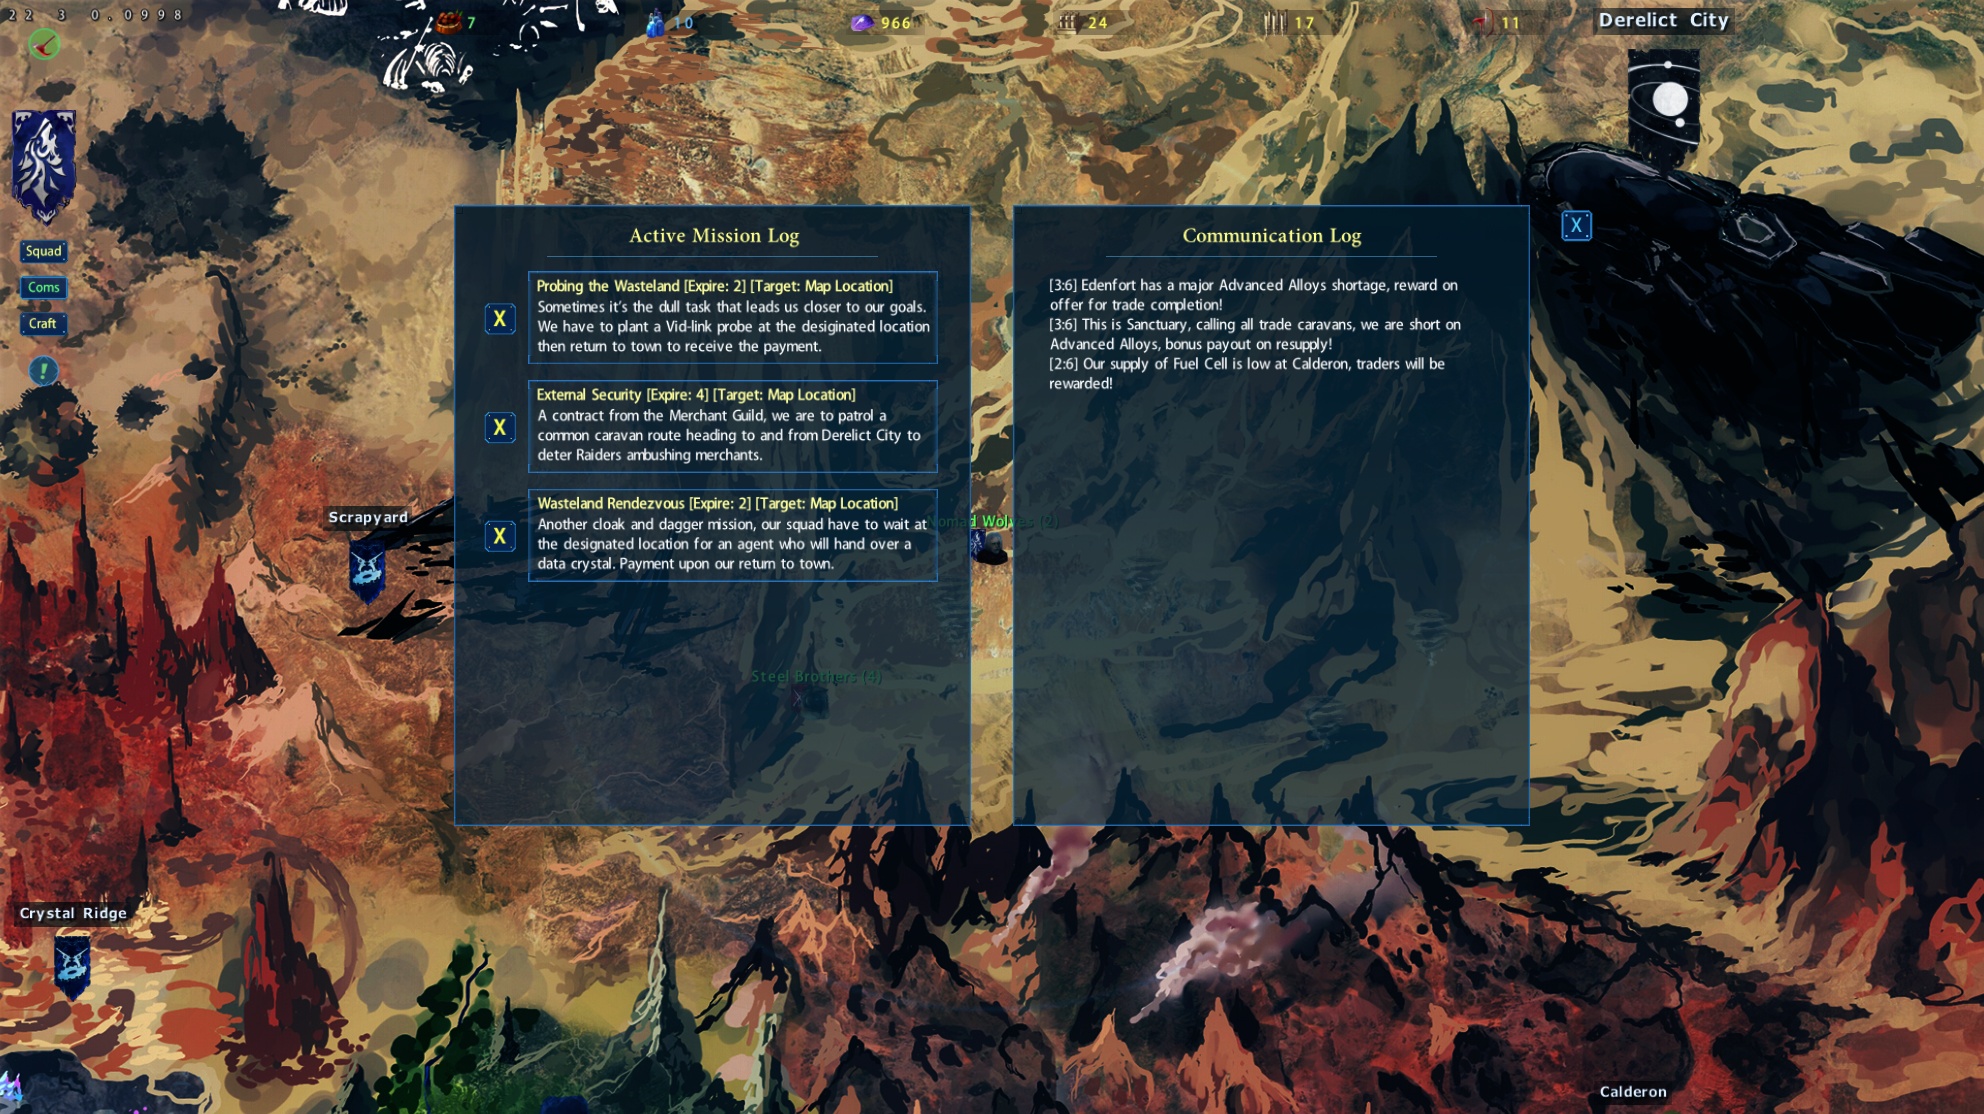
Yes there’s a mission & communications log!
Finally, the absence of a log in Star Nomad 2 was a mistake that I won’t repeat, so this time around, all the communications that you receive on the world map will be logged for access. Current active missions are also tracked and you are able to cancel them, though there’s negative consequences for failing to carry out a contract.
The next blog entry will be about the combat mechanics and design.